
Cuando se trata de lucir atractivo y hermoso de arriba a abajo, hacemos todo lo posible para que nos veamos elegantes. Pero la parte más confusa es decidir sobre el peinado que podemos llevar con ese vestido o para esa ocasión en particular. No es que tengamos opciones limitadas de peinados para elegir. Pero es que tenemos tantas opciones de peinados que nos confundimos cuál llevar. Especialmente, cuando se trata de hacer trenzas capilares. Qué fácil suena, pero en realidad no es tan fácil con todos los giros y vueltas que tenemos que hacer. También tenemos que comprobar qué trenza nos quedará bien. Y cómo podemos olvidarnos de las ocasiones, obviamente, nuestras trenzas de cabello también tienen que estar de acuerdo con la ocasión.
Para simplificar la confusión relacionada con el estilo de trenza para el cabello que puede elegir según la ocasión y el estilo, compartimos con usted alrededor de 45 peinados de trenza fácil . Algunas son fáciles de hacer, pero otras son complicadas, lo cual no se puede hacer sin una mano amiga. La moda de las trenzas capilares nunca va a acabar. Y en algunas ocasiones, no puedes peinarte sin una trenza. Muchas personas se relacionan con las trenzas del cabello para las ocasiones tradicionales solamente. Pero la realidad es que las trenzas capilares son para cada evento. Ya sea un concierto de rock, una noche de graduación, una fiesta formal, una boda o una ceremonia de recepción o un evento informal, las trenzas de cabello son una tendencia en cada ocasión. Es solo que necesitas descubrir la trenza de cabello correcta para la ocasión correcta.
Los peinados trenzados fáciles que compartimos en esta página tienen todas las colecciones. Para un elegante para una novia o una fiestera, verás todo tipo de trenzas aquí. Junto con eso, también estamos compartiendo con ustedes cómo hacer estas trenzas de cabello. Algunas trenzas para el cabello pueden necesitar solo 10 minutos para hacerlas, mientras que las otras trenzas para el cabello pueden requerir más de una hora para terminar. Echemos un vistazo a los tipos de trenzas de pelo con cómo hacerlo.
(1) Trenzas afroamericanas
Si tienes cabello largo con volumen completo, entonces definitivamente debes probar esta trenza para el cabello. Las trenzas largas, elegantes y únicas en toda tu cabeza seguramente harán girar muchas cabezas a tu alrededor. Como estas trenzas afroamericanas te darán un look y animado. También puedes llamarlos como una especie de caja de trenzas. Pero solo podrás llevar esta trenza si tienes el pelo largo.
Cómo hacer trenzas afroamericanas:
- Para comenzar con este trenzado de peinado, primero tendrás que lavarte el pelo correctamente. Además, acondicionarlo bien.
- Ahora deja que se sequen. Después de eso peina tu cabello, para desenredar cada nudo.
- Como se puede ver en la imagen, el cabello está separado por un lado. Entonces, también tienes que separar tu cabello de un lado.
- Ate un lado del cabello con una banda elástica para que no se mezcle mientras hace las trenzas del otro lado.
- Con la ayuda del peine de cola, tome alrededor de 1 pulgada de sección del cabello usando la cola del peine.
- Divide esa sección de cabello en 3 partes y comienza a trenzar hasta que llegues al final de las hebras de cabello de esa sección. Para asegurar el final, ate el cabello con una banda elástica.
- De manera similar, comience a recoger una sección de 1 pulgada una y otra vez, y comience a hacer la trenza dividiéndola en 3 partes y haciéndola hasta el final.
- Una vez que haya terminado con un lado, puede desatar el otro lado del cabello y comenzar de nuevo el mismo procedimiento.
- Tus trenzas afroamericanas estarán listas ahora.
Consejos para trenzas afroamericanas
Recuerde, hacer este estilo de trenza llevará mucho tiempo, y también necesita mucha paciencia. Limpia tu cabello siempre antes de hacer este peinado. También puedes usar un buen aceite para asegurar que las trenzas del cabello dejen que el cabello salga.


(2) Trenza voluminosa grande
Habría adivinado solo por su nombre que tipo de trenza es. Como esta trenza ayudará a dar volumen a tu cabello haciendo la trenza. Como todos ustedes pueden ver en la imagen, es una hermosa trenza lateral grande y voluminosa. Esta trenza se puede transportar en múltiples ocasiones, como bodas, recepciones de bodas, fiestas informales y en muchas ocasiones. También incluye el trenzado francés en él.
Cómo hacer gran trenza voluminosa:
- Para comenzar con esta trenza capilar, en primer lugar, riza tu cabello, ya que le agrega volumen al cabello.
- Deje algunos mechones sueltos en la parte frontal por ambos lados con una partición media, como puede ver en la imagen.
- Peina el resto del cabello hacia atrás creando una corona para obtener más volumen.
- Ahora lleva tu cabello a un lado donde quieras que esté la trenza.
- Empieza, trenzando tu cabello con el estilo de trenzado francés. Hemos mencionado en este artículo cómo hacer trenzas francesas.
- Pero aquí el trenzado debe estar un poco suelto, ya que solo entonces se verá como una gran trenza voluminosa.
- Sigue agregando pelo a la trenza mientras cruzas cada sección de la esquina sobre la media.
- Haz el trenzado hasta el final y luego ata el cabello con una banda elástica.
- Ponga un poco de spray para el cabello, para que su cabello se vea hermoso. Tu gran trenza voluminosa ya está lista para hacer alarde.
Consejos para grandes trenzas voluminosas
Como debe mantener el volumen, asegúrese de agregar pelo a cada sección mientras trenzas francesas, tome más cantidad de cabello cada vez. Te dará un aspecto perfecto de una gran trenza voluminosa.


(3) Boho Braid
Esta trenza también se conoce como trenza bohemia y es una de las trenzas famosas. Sin duda son preciosos y fáciles de hacer. Debido a que es muy simple pero elegante a su manera, esta trenza se puede llevar todos los días con facilidad. Para darle un aspecto casual a tu cabello o hacer una trenza simple pero atractiva, opta por Boho Braid. Puedes usarlo con un vestido o vestido encantador o incluso con un par de jeans y una camiseta también. Este estilo de trenza boho es un estilo medio temerario. Vamos a ver cómo podemos hacerlo.
Cómo hacer Boho Braid:
- Para comenzar con esta trenza, en primer lugar, haga una separación lateral de su cabello.
- Ahora, tome las trenzas del área de la línea del cabello, del lado que tiene más cabello después de la partición del lado.
- Comienza a hacer una trenza de cola de pez, pero tiene que ser una trenza delgada. Puedes leer los pasos de hacer una trenza de cola de pescado a continuación.
- Solo para agregar algo de volumen, tire de los bordes de la trenza de la cola de pescado y luego átelos con una banda elástica.
- Toma algunos pelos más del mismo lado del cabello junto a esta trenza que hiciste en los pasos anteriores.
- Tienes que hacer una trenza normal usando tres hebras. Entonces, divide el cabello que tomaste en tres secciones y comienza a hacer una trenza regular.
- Cuando alcance el borde de la trenza, tire de ella para agregar volumen. Y luego atarlo con una banda elástica.
- Ahora tienes que tomar una pequeña cantidad de cabello del otro lado. Reúna las dos trenzas y el cabello del otro lado en la parte posterior de la cabeza.
- Átelos con una banda elástica, pero no saque el pelo completo del elástico. En su lugar, déjalos a la mitad haciendo un bucle como ese en la imagen.
- Tire del elástico de ambas trenzas, pero no de la última, que ha atado el cabello de ambos lados en un bucle.
- Cubre la banda elástica que está atando las trenzas del cabello y el cabello de ambos lados con tu cabello. Y métela en la parte posterior con un pasador.
- Tu Boho Braid está lista de una manera elegante.
Consejos para Boho Braid
Este estilo se verá hermoso en el cabello lacio, pero también puedes probarlo en el cabello rizado. Ya sea que tenga que llevar cabello para la trenza de cola de pescado o trenzas normales de tres hebras o el cabello suelto, solo tome una pequeña cantidad de cabello.


(4) Trenzas de arco
Esta trenza se ve linda, no importa que sea llevada por una adolescente o una mujer. Añade un estilo y un look divertido a tu cabello. Pero cuanto más adorable se ve, más difícil es hacerlo. Si está probando este tipo de trenza por primera vez, entonces le sugerimos que tome ayuda. Use este look para una fiesta de cumpleaños o una fiesta informal, para cualquier evento tradicional también. Y si hablamos de vestidos, de un vestido de una pieza, a un vestido largo hasta la rodilla o un vestido de fiesta, o emparejarse con una chaqueta de cuero y un denim, se verá bien. La mujer de la foto lleva un peinado de trenza en arco diagonal, que aprenderemos aquí.
Cómo hacer Bow Braid:
- Comience con la división de cabello justo arriba del extremo de la ceja derecha y tome esta división diagonalmente hacia el lado izquierdo. Pare alrededor de 1 pulgada por encima de la oreja izquierda. Y luego bajarla directamente hacia la frente formando una línea recta.
- Ate el cabello de la parte dividida con una banda para el cabello, ya que tenemos que usarlo más adelante.
- Como tenemos que hacer una trenza diagonal de arco, la trenza también será diagonal. Comience a hacer una trenza francesa en diagonal que tiene que ir hacia la parte posterior de la cabeza. Para saber cómo hacer French Braid, lea a continuación el tutorial de French Braid.
- Sigue haciendo la trenza francesa en diagonal hasta el final. Si las trenzas de cabello no se dejan para agregar en la trenza francesa, puede hacer una trenza normal. Átalo con la ayuda de una banda elástica.
- Ahora es el turno de hacer el arco, que es la parte principal de esta trenza. Así que, para que se desate el pelo dividido. Y puedes usar una cantidad de gel para el cabello o cera para hacer que el arco se vea perfecto.
- Para hacer arcos, necesitaremos horquilla. Deslice la horquilla hasta la primera puntada superior de la trenza francesa. Toma una pequeña cantidad de cabello del cabello suelto en la parte superior y haz un bucle usándolo.
- Sosteniendo el lazo de la mano izquierda, deslícelo hasta el final de la horquilla.
- Tire lentamente de su horquilla hacia atrás desde el lazo de la trenza. La cola del pelo también vendrá junto con él creando otro bucle. Ambos bucles harán una mirada de arco.
- Una vez, cree un arco, retire la horquilla y comience a hacer el otro arco siguiendo el mismo procedimiento.
- Siga haciendo la reverencia hasta que esté la trenza francesa, pero no en la trenza normal.
- Tu peinado super lindo de Bow Braid está listo.
Consejos para trenzas de arco
Los consejos que estamos compartiendo aquí son muy importantes para hacer esta trenza de arco. Recuerde que debe colocar el arco en la parte superior de cada punto de Braid francés. El pelo del extremo del arco debe colocarse en el lado izquierdo de French Braid para que puedas esconderlo fácilmente mientras haces el siguiente lazo. Una vez que el Bra Braid esté listo, use laca para el cabello para mantener el arco en un lugar.


(5) Trenzas De Caja
Habría visto esta trenza en su mayoría llevada por mujeres africanas, sin embargo, es una de las trenzas con tendencia. No es tan difícil de hacer, pero seguramente tomará muchas horas para terminar. Desde cabello largo a mediano y hasta los hombros, este look puede combinarse con todos estos tipos de cabello. Incluso puedes usar extensiones de cabello para que se vean llenas de volumen. Pero, de nuevo, se convertirá en una tarea tediosa para ti. Sugerimos trenzas de caja peinado para usar a diario o para ocasiones informales o casuales.
Cómo hacer Box Braid:
- Tu cabello debe estar limpio y lavado antes de comenzar con esta trenza. Condiciona adecuadamente usando un buen acondicionador.
- Peina tu cabello desde la raíz hasta la punta, resolviendo todos los nudos.
- Para comenzar a hacerlo, primero divida el cabello en 4 secciones iguales, lo que significa dos en la parte posterior y dos en la parte delantera.
- Tome una de las secciones de la parte frontal y ate las 3 secciones por separado con una banda para el cabello.
- Tome una pequeña cantidad de cabello de la sección que está suelta y comience a trenzar. Puedes hacer un trenzado normal usando 3 hebras de pelo.
- Asegúrate de que la trenza no esté demasiado suelta ni demasiado apretada, de lo contrario te lastimará y dañará tu cabello también.
- Sigue trenzando hasta el final y para asegurar la trenza, usa una banda elástica para atarla o deja que sea así solo.
- De manera similar, trenzar el cabello de toda la sección desde la raíz hasta la punta.
- Desate las otras secciones también una por una después de terminar las trenzas de cada sección siguiendo los mismos pasos.
- Tendrá alrededor de 80 a 100 trenzas en la cabeza, dependiendo del volumen de su cabello.
- Elegantes, trenzas de caja larga ya están listas.
Consejos para Box Braid
No mantengas este estilo de trenza por más de un mes, ya que puede dañar tu cabello. Duerma sobre una almohada de seda o cubra su cabeza con un pañuelo de seda, para que no destruya sus trenzas. Haga, limpie su cuero cabelludo cada semana y aplique aceite para el cabello. Si te lavas el cuero cabelludo y las trenzas con cuidado, no te molestarán las trenzas.


(6) Trenzas Boxer
Las trenzas de boxer te dan el aspecto del rocking chic. Puedes llevar esta trenza para diferentes ocasiones, como si vas a un concierto de rock o vas a salir por la noche de chicas o ir a un club. Inicialmente, tomará tiempo para hacer trenzas de boxeador, pero cuando lo haga de vez en cuando, le resultará más fácil diseñar trenzas de boxeador.
Cómo hacer trenzas boxer:
- Antes de empezar, asegúrate de que las hebras de tu cabello estén limpias y desenredadas. También, aplique un poco de aceite o laca para el cabello para arreglar el peinado.
- Haz dos divisiones iguales de tu cabello partiendo desde la mitad hasta la espalda hasta el cuello, igual que haces mientras haces coletas. Asegúrate de que la división y división del cabello estén bien hechas.
- Ate ambas secciones por separado utilizando bandas elásticas.
- Ahora desate una sección de cabello y saque algunos mechones de cabello de la parte frontal de esa sección. Comienza a hacer trenza francesa y sigue agregando más y más cabello para hacer la trenza larga y gruesa. Recuerde que los hilos sueltos del cabello deben dejarse mientras trenzan. Haz la trenza hasta el final y átala con una cinta para el pelo.
- Es el turno para la otra sección, así que desatenlo. Y comienza a hacer lo mismo que hiciste en la primera sección.
- Ponga un poco de laca, para que el estilo no se desordene al aflojar las hebras del cabello.
- Tu peinado de trenzas Boxer ya está listo.
Consejos para trenzas boxer
Si estás haciendo trenzas de boxeador, recuerda que se ven bien cuando están limpias. Por lo tanto, en caso de que tenga un cabello áspero o rizado, rocíe un poco de agua sobre el cabello. No deje hebras de pelo entre las trenzas mientras trenzas.


(7) Trenza para Bun
En muchos sentidos, puedes probar la trenza para lucir. Puede ser cualquier trenza que puedas enganchar con el bollo o alrededor del bollo. Por lo tanto, no hay una forma fija de este peinado, ya que incluye diferentes trenzas y bollos. Pero el que está en la foto se ve descarado con ese moño desordenado. Entonces, aprenderemos a crear esta trenza para lucir. Es un estilo divertido y casual, que se ve vibrante. Puede llevarlo a cabo por la noche o en una fiesta en casa o para cualquier sesión de juego o eventos tan divertidos.
Cómo hacer Braid to Bun:
- A diferencia de otro peinado trenzado, aquí no es necesario que empieces a peinar cuidadosamente tu cabello. Simplemente comienza con el aspecto natural del cabello. No importa si es rizado u ondulado o recto.
- En primer lugar, burlarte de tu corona de pelo. Y haz la partición tomando una sección del pelo frontal y lateral. Átelos con un alfiler o una banda.
- Toma el pelo que queda en la espalda que está suelto. Manténgalos a todos suavemente en su mano en una cola de caballo.
- Usando la otra mano, simplemente mete el cabello en la parte posterior para hacer un bollo desordenado. Asegure el bollo con una banda de goma o una banda elástica.
- Necesitaremos pasadores de bobby ahora, ya que tienes que meter todo el pelo suelto que queda en la parte posterior de la cabeza.
- Suelte el pelo en la parte delantera y sepárelos en dos secciones.
- Comience a hacer una trenza regular usando una de las secciones.
- La trenza se dirigirá hacia atrás de la cabeza.
- Una vez que haya hecho la trenza de una sección del cabello frontal, colóquela sobre el moño con alfileres.
- Del mismo modo, haz una trenza con otra sección también y métela debajo de la primera trenza en la parte posterior de la cabeza con alfileres.
- Además, remueve el cabello que sale de la trenza con alfileres.
- Obtendrá el mismo aspecto que en la imagen de una trenza con un moño desordenado.
Consejos para Braid to Bun
Para obtener el mismo aspecto que aparece en la imagen, puede hacer que su cabello se vea ondulado con la plancha para el pelo o alisarlo.


(8) Bubble Fishtail Braid
¿Quieres ser la reina de la trenza del grupo de tu chica? Entonces, definitivamente deberías probar esta trenza de cola de pez burbuja. Se ve increíble no solo por su aspecto sino también por la forma en que está hecho. En la imagen, puedes ver que se ha hecho sobre un cabello liso y de textura recta. No te preocupes por las mujeres con cabello rizado u ondulado, ya que también puedes probar este Bubble Fishtail Braid.
Cómo hacer Bubble Fishtail Braid:
- Haga secciones del cabello, alrededor de 1 pulgada por encima de las orejas. Usando sus manos, recoja su parte posterior de la cabeza o hacia la corona.
- Ahora, comenzaremos haciendo una trenza de cola de pescado. Al igual que nosotros, recogiendo una hebra de cabello desde el borde en el exterior, y luego hasta la parte superior, y luego agregarlo a otro lado.
- Ahora es el turno del lado opuesto. Y haremos lo mismo en este lado también.
- Sigue repitiéndolo, hasta que trenzas alrededor de 4 pulgadas hacia abajo.
- Ahora panqueque al menos 4 puntos de cola de pescado volviendo. Ayuda a formar las burbujas fácilmente.
- Una vez que haya terminado con el panqueque, vuelva a hacer el trenzado de cola de pescado para las próximas 4 pulgadas.
- Repita los pasos de panqueque otra vez, hasta que se quede sin pelo. Usando una banda elástica, asegurar el cabello.
- Para dar más volumen a las burbujas, haga que las burbujas pancaked sean perfectas.
- Tu trenza Bubble Fishtail está lista ahora.
Consejos para Bubble Fishtail Braid
Haga panqueques correctamente, para que las burbujas formadas se vean bien y llenas de volumen. Como alternativa, puede usar laca para el cabello al final para fijar la trenza en un lugar.


(9) trenza de enlace de cadena
Todos habréis visto este estilo de trenza de pelo muchas veces llevada por muchas deportistas o muchas bailarinas o chicas que hacen ejercicios aeróbicos. Es un tipo de trenza muy deportiva, que te hará lucir descarado incluso mientras te preparas para las sesiones deportivas. Y al ser una trenza fácil, la mayoría de las mujeres podrán hacer la Cadena trenzada.
Cómo hacer Chain Link Braid:
- Como se puede ver en la imagen, hay tres movimientos inferiores en la parte superior de la cabeza. Por lo tanto, si desea hacerlo, también puede hacerlo haciendo tres particiones separadas en la parte superior de la cabeza. Y luego volteando el pelo bajo el nudo. O si desea continuar sin hacerlo, simplemente siga los pasos a continuación.
- Tira todo el cabello en una cola de caballo en la parte superior de la corona como una cola de caballo alta. Y asegurarlo con la ayuda de un clip.
- Divide la cola de caballo en 2 secciones por igual. Y saca una de las secciones del clip.
- Ahora divida la sección del cabello sin cortar en dos hebras por igual.
- Tienes que torcer ambos mechones hacia la derecha.
- Ahora júntalos, y gira hacia la izquierda.
- Sigue trenzando la cuerda trenzando hasta el final. Y luego atarlo con una banda elástica.
- Ahora es el turno de la otra parte de la cola de caballo que todavía está recortada. Entonces, suelta eso también.
- Ahora comienza con la primera sección dividiéndola en 2 hilos por igual. Y luego girándolos por separado hacia la derecha. Después de eso, girando ambos juntos hacia el lado izquierdo. Continúa trenzando de manera similar, hasta que llegues al final, y átala con la banda.
- Ahora tienes 2 trenzas de cuerda retorcida, así que empieza a torcerlas juntas hacia la derecha.
- Como resultado de esta torsión de trenzas, el bloqueo se creará y formará una cadena trenzada.
Consejos para la malla trenzada
Recuerde la dirección en la que va a hacer la torsión de la cuerda. Puedes darle un acabado a esta trenza, agregándole laca para el cabello.


(10) Trenzas De Cornrow
El nombre y el aspecto de esta trenza nos hacen sentir cuán elaboradas son las trenzas cornrow. Una vez que conozca la forma de hacer cornrows, podrá hacerlo a la perfección. Es diferente a otras trenzas porque se está haciendo en el cuero cabelludo. Hacer estas trenzas, requiere mucha paciencia y tiempo. Desde las hileras de maíz delgadas hasta las hileras de maíz gruesas, puedes ir por cualquiera Incluso tienes la opción de agregar extensiones para que se vean hermosas. En esta imagen, puedes ver las trenzas curvas de maíz que luego se colocan juntas para formar un bollo.
Cómo hacer trenzas de cornrow:
- Limpia tu cabello adecuadamente usando un buen champú y un acondicionador. Y luego peinar su cabello directamente después de secarlos con una toalla.
- Ahora puedes dividir las hebras de tu cabello en secciones gruesas con la ayuda de un peine.
- Está en ti cómo quieres que sea tu cornrow. Por lo tanto, dividir sus paquetes cornrow en consecuencia.
- En general, las fresas están hechas de adelante hacia atrás, así que solo lo haremos.
- Ahora, coloque las pinzas para el cabello en cada extremo de los paquetes de cornrow, dejando uno que ayudará a mantenerlos juntos durante el trenzado de cada fila.
- Aplique cera o grasa para el cabello en cada paquete de cornrow desde el cuero cabelludo hasta el final del paquete de cornrow.
- Ahora divida el haz de cornrow que se descompone en tres secciones por igual.
- Ahora comience a trenzar moviendo el medio sobre el izquierdo, y luego el nuevo medio que fue anterior dejó sobre el derecho. Tire de su cabello con fuerza.
- Ahora, siga haciendo el mismo proceso, y recoja y agregue el pelo en el mazo de maíz para que tenga suficiente para trenzar.
- Hacer trenzas hasta el final.
- Ahora tiene que hacer lo mismo con otros paquetes de cornrow que So, siga quitando su clip uno por uno y continúe trenzando con el mismo proceso.
- Sus trenzas de cornrow estarán listas una vez que termine de trenzar todos los haces de cornrow.
- Si desea dejarlos así, puede hacerlo en un bollo también en la parte posterior de la cabeza.
Consejos para trenzas de cornrow
Use cera o grasa para el cabello antes de comenzar el trenzado de cornrow. Tire de ellos con fuerza hasta que comience el paquete de cornrow después de la primera puntada, para que se vean perfectos y perfectos. Deben estar apretados, así que tira de ellos mientras trenzas.


(11) Trenzas De Ganchillo
No hay duda de que esta trenza del pelo se ve extremadamente fascinante la forma en que se hace. ¿Pero sabes un secreto sobre las trenzas de ganchillo? Las trenzas de ganchillo no son las verdaderas trenzas, ya que son las trenzas artificiales que se agregan o se colocan en la cabeza para darle un hermoso aspecto de ganchillo. Hay una variedad de trenzas de crochet disponibles en el mercado de diferentes tamaños y colores, puedes comprarlas y puedes aprender cómo colocarlas. A la apariencia, a muchas mujeres les gusta esta apariencia, y se puede usar en el lugar de trabajo, en eventos oficiales, en clubes y conciertos también.
Cómo hacer las trenzas de ganchillo:
- Para agregar la extensión de las trenzas de crochet a su cabeza, primero deberá hacer el trenzado de cornrow. Puedes leer sobre esto arriba.
- Comience a agregar las trenzas de ganchillo al cabello con la ayuda de un pasador o una aguja de ganchillo.
- Para agregar una trenza de ganchillo, tendrá que deslizar la aguja de ganchillo debajo de su trenza de cornrow con el cierre cerrado.
- Al abrir el pestillo, el pelo debe engancharse en la aguja. Después de que cierre el pestillo.
- Ahora tienes que jalar tanto el cabello como la aguja debajo de la trenza de cornrow. Asegúrate de hacerlo hasta que veas un aro de tamaño mediano.
- Ahora verá el bucle en un lado y la cola en el otro lado de la trenza cornrow.
- Ahora tienes que poner las colas a través del bucle doblando sobre la trenza de cornrow.
- Pero no lo hagas apretado.
- Usando tus dedos, tienes que girar el lazo.
- Nuevamente, pase las colas por el bucle y luego apriete el cabello tirando de él.
- Ahora, la primera trenza de ganchillo o pelo de ganchillo está asegurado.
- Haga esto hasta que cubra su cabeza completa. Y solo entonces estarás listo con tus trenzas de ganchillo.
Consejos para las trenzas de ganchillo
Le sugerimos que tome la ayuda de un experto en lugar de hacerlo usted mismo si lo hace por primera vez. Aplique aceite en la cabeza para mantenerlos hidratados.


(12) Trenza de textura dual
Este tipo de trenza parece muy elegante, ya que muestra la mezcla de dos trenzas en diferentes estilos. Como se puede hacer con muchas combinaciones, puedes llevar el look a diferentes ocasiones. Este trenzado de doble textura que se ve en la foto es muy bonito. Uno puede usarlo en la universidad, en cualquier fiesta o evento, mientras viaja, y para muchas de esas ocasiones.
Cómo hacer trenza texturizada dual:
- En primer lugar, para agregar textura a tu cabello, necesitas rizarlo.
- Ahora, haga una separación profunda en el lado derecho y jale todo el cabello hacia el hombro izquierdo.
- Recoge el pelo de la parte superior de la cabeza, para hacer una trenza francesa.
- La trenza debe bajar por detrás de tu oreja izquierda.
- Comience a agregar pelo a la trenza francesa recogiendo el pelo de la línea del cabello.
- Deje de hacer la trenza una vez que llegue al borde donde se juntan la cabeza y el cuello, incluso si las hebras del cabello quedan.
- Asegúrate de que la trenza esté apretada, asegúrala con un clip.
- Empieza a hacer French Braid desde el pelo izquierdo del lado derecho.
- Pero tienes que hacer la trenza siguiendo la parte posterior del cuello hasta que se encuentre con la primera trenza en el lado izquierdo.
- Si las dos trenzas ahora se encuentran, combina el cabello ahora.
- Haz una trenza de cola de pescado ahora combinando el cabello hasta el final.
- Tu cabello de doble textura con la combinación de trenzas de cola de pez y francés está listo, igual que el de la imagen.
Consejos para la trenza de doble textura
Para hacer que esta trenza se vea hermosa y perfecta, puedes usar laca para el cabello como alternativa.


(13) Coletas trenzadas holandesas
Es fácil de hacer una trenza, y va bien para las ocasiones casuales. Hacer trenzas de trenzas holandesas no es algo muy difícil de hacer. Y obtendrás más y más perfección cada vez que intentes esto. Obtendrá un aspecto moderno con esta trenza en solo 10 minutos. Y la forma en que la chica ha hecho en la imagen al agregar un tono de color a las trenzas, hace que se vea más impresionante.
Cómo hacer trenzas de trenzas holandesas:
- Comience con la división de su cabello desde la mitad de la parte frontal hasta la parte posterior de la cabeza, creando dos secciones.
- Asegure una de las secciones utilizando un clip, y trabajaremos en la otra sección.
- Peina rápidamente la otra sección para resolver cualquier nudo, y ahora comenzaremos la parte de trenzado.
- Elija una pequeña cantidad de mechones de cabello de la cabeza frontal cerca de la línea del cabello y haga tres partes con ellos.
- Ahora, tienes que hacer uno o dos puntos de cruce bajo la trenza.
- A partir de la tercera puntada, comience a agregar pelo a la trenza, como lo hace en French Braiding. Pero recuerde, es un cruce bajo la trenza que no cruza la trenza. Por lo tanto, tienes que trabajar las hebras desde abajo, no sobre la otra.
- Sigue agregando pelo a ambos lados mientras trenzas.
- Asegúrese de que su trenza se está moviendo hacia la parte posterior de la cabeza en línea recta.
- Deténgase una vez que llegue a la parte posterior de su cabeza o al comienzo del cuello.
- Ahora asegure su trenza holandesa con una banda elástica.
- Retire la pinza para el cabello del otro lado y siga el mismo procedimiento en ese lado también.
- Haga el trenzado de la otra sección también hasta el inicio del cuello solo y asegúrelo también utilizando la banda elástica.
- Tus trenzas de trenzas holandesas ya están listas.
Consejos para trenzas holandesas
Sigue agregando pelo a la hebra después del primer o segundo punto.

(14) Trenza holandesa
Al igual que las trenzas de cola de cerdo holandesas, la trenza holandesa simple también parece bastante impresionante. Lo que nos gusta de Dutch Braid es que puedes hacerlo fácilmente por tu cuenta. Y la Braid holandesa también se puede hacer en el cabello largo y en el mediano, así que esto es una ventaja si tienes el pelo largo hasta el hombro. Un trenzado holandés simple puede ir con diferentes atuendos en diferentes eventos, desde informales hasta formales. Uno puede traer este estilo para uso diario también. Aquí, aprenderemos a hacer trenzas holandesas dobles como en la imagen.
Cómo hacer trenza holandesa:
- Peina tu cabello para resolver todos los enredos y luego haz la partición media por igual desde la parte frontal hasta la parte posterior. Entonces, ahora tendremos 2 secciones de cabello iguales.
- Usando una banda de goma, asegure una sección. Y deja que la otra sección se suelte.
- La sección de cabello que está abierta, comenzaremos a hacer Dutch Braid a partir de ella.
- Recoge las hebras de pelo de la parte frontal de la cabeza. Divide las hebras en 3 secciones por igual.
- Ahora, toma la hebra media y cruza por debajo de la hebra izquierda. Ahora, la hebra izquierda entrará en el medio.
- Ahora debes elegir la hebra izquierda que está en medio y cruzarla por debajo de la hebra derecha.
- Repita este paso una vez más cruzando las hebras intermedias debajo de las dos hebras laterales.
- Antes de comenzar la tercera puntada, agregue pelo a la hebra lateral debajo de la cual cruzará la hebra intermedia. Por lo tanto, debe ser la cadena lateral izquierda.
- Ahora, hazlo en la siguiente puntada también agregando pelo a la hebra del lado derecho.
- Por lo tanto, continúe trenzando así solo agregando pelo a ambos lados y cruzando la hebra intermedia debajo de las hebras laterales.
- Tu trenza irá hacia la parte posterior de la cabeza.
- Si ahora no tiene pelo para agregar en la trenza, haga la cruz normal debajo del trenzado hasta el final. Y luego atar al final con una banda elástica.
- Suelte la otra sección de cabello y siga los mismos pasos con esa sección de cabello también.
- Del mismo modo, asegure esa trenza también al final con la ayuda de la banda elástica.
- Las dobles trenzas holandesas están aquí.
Consejos para la trenza holandesa
Asegúrate de agregar el cabello por igual a ambos lados mientras trenzas, de lo contrario se verá extraño.


(15) Trenza de cola de pescado holandesa
Otra trenza holandesa, con el estilo Fishtail. Como puede ver, se trata de una trenza de cola de pez holandesa lateral y parece una trenza clásica. Las trenzas holandesas nos proporcionan diferentes variedades de trenzas, que pueden resolver nuestro problema en cualquier ocasión. Ahora, ya sea en tus planes de viaje con tus amigos o en el plan para una noche de graduación, o para un concierto musical, te verás impresionante con este peinado con trenza.
Cómo hacer una trenza de cola de pescado holandesa:
- Haga la separación lateral del cabello y peínelo adecuadamente antes de comenzar a trenzar.
- Ahora tome un lado del cabello y recójalo cerca de su línea del cabello y divídalos en tres hebras iguales para hacer una trenza holandesa. Tu trenza debe ir detrás de tu oreja por lo menos 1 pulgada por encima de ella.
- Haz la trenza holandesa hasta la nuca y tendrás que llevarla al otro lado desde la parte posterior.
- Además, lleva el pelo que queda de este lado al otro solo.
- Y ahora, empieza a hacer una trenza con cola de pescado.
- Tienes que hacerlo utilizando dos secciones de pelo. Después de eso, agregue una hebra delgada de cabello desde el lado izquierdo del cabello.
- Pon el pelo sobre la trenza de cola de pescado combinándolo con el pelo de la sección izquierda.
- De manera similar, traiga la hebra de cabello desde fuera del lado derecho del cabello. Y póngala sobre la trenza combinándola solo con la hebra de cabello de la sección izquierda.
- Asegure la trenza del pelo utilizando una banda elástica.
- Mueve la trenza holandesa tirando suavemente las trenzas de las trenzas.
- Haga lo mismo con la trenza de cola de pescado también, separándola ligeramente.
- Ahora tendrás una trenza holandesa perfecta.
Consejos para la trenza de cola de pescado holandesa
Esto se verá bien solo si tienes el pelo largo. Deje unos mechones de cabello en la sien para darle forma a su cara.


(16) Trenzas espirales holandesas
La combinación de las dos trenzas se verá genial, pero no es tan fácil de hacer. Las trenzas espirales holandesas se pueden formar de muchas maneras. También se puede transformar en un bollo de trenza espiral holandés. O se puede dejar como una cola de caballo en la imagen. No sugeriríamos esto para ningún evento formal. Pero puedes probarlo en el uso diario, o en las fiestas de gatitos, cumpleaños o noches de chicas como eventos.
Cómo hacer trenza espiral holandesa:
- Antes de comenzar a hacer esta trenza, asegúrese de que su cabello no esté grasoso y de que se limpie correctamente con un champú. Haz el acondicionamiento del cabello también.
- Seca tu cabello adecuadamente y luego desenreda con un peine.
- Solo con la ayuda de su peine, ubique el centro de su cabeza y luego tome una pequeña cantidad de cabello exactamente desde la mitad de la cabeza.
- Ahora, tienes que hacer una trenza holandesa, así que divídelo en tres partes iguales.
- Ya hemos mencionado anteriormente cómo hacer una trenza holandesa.
- Agrega los pequeños mechones de cabello a tu trenza holandesa mientras trenzas en un movimiento circular.
- You will see, that spiral shape is already building.
- Keep braiding till your reach the end and then tie it with an elastic band.
- Now it’s your wish either you can add the extra braid by passing it along the circular braid you have created to make it spiral and can then secure it using Bobby Pins. It will be a Dutch Spiral Braid Bun.
- Or you can tuck the extra braid at the center or at the back from the head and leaving it in the ponytail form. Tuck the hair coming out from the spiral braid on the head using hair pins.
Tips for Dutch Spiral Braid
If you want to keep this braid for a long time, it is better to put hairspray, once you finish it off.


(17) Fishtail Braids
Fishtail Braids look really very attractive if done properly. Especially those done with the thick plaits are really admirable because of the elegance they carry. Many people even after trying for a number of times are not able to do the fishtail braiding neatly. It comes in the category of braids, which one can carry with almost every outfit and on every occasion.
How to do Fishtail Braids:
- To start the fishtail braid, first untangle your hair properly by combing.
- Now take your hair together, bring it to the back of the head and make a low ponytail by tying it.
- Split the hair of your low ponytail into 2 equal sections.
- Now to make the fishtail braid, pick hair from the back of the right-side section. Cross this hair strand over the left-side section.
- Pick hair from the back of the left-side section and cross it over the right-side section.
- Keep repeating the same steps by moving downwards. Secure your hair using an elastic band at the mid-length.
- Again, start the plaiting in a similar way, this time pulling hair more tightly for a tidy finish.
- When you will reach the end, again secure your hair with an elastic band.
- With the help of a scissor, cut the elastic band you used at the top for tying your hair into a ponytail.
- If required, you can gently pull plaits a little bit away. Or else let it be like that only.
- You will now get a beautiful fishtail braid.
Tips for Fishtail Braids
Use elastic band only, so that you can cut it easily. Pull hair tightly to give the braid a perfect look. For avoiding and saving hair from flying or coming out, you can use a hairspray.


(18) Fishtail Flower Braid
This hair braid style looks lovely for all the occasions and parties. You will catch many eyes looking at you and many women talking about your hairstyle. If you have long hair, you can go for this Fishtail Flower Braid without any doubt. It is not very easy to do but also not the difficult one. With patience, you will surely be able to do this.
How to do Fishtail Flower Braid:
- Firstly, comb all your hair towards the back.
- Then take some hair strands from the right side and some from the left side. And tie them together at the back with the elastic band.
- Start making a three-strand braid now, with the help of which we will make the flower.
- Once you are done with making a three-strand braid, tie it using an elastic band after pulling one side’s braid to add volume to the braid.
- Start rolling the braid, in the shape of a cinnamon bun.
- Make sure that the side having more volume should be kept out.
- This will look like a flower, which is arranged by rolling up the braid from the end. It should be in a round shape.
- To secure the flower braid, tuck it at the place using bobby pins.
- Now pick some hair strands below the flower braid bun. And divide it into two sections.
- You have to now make a fishtail braid.
- Bring an outer strand from the right and cross it over left. And add it to left section hair only.
- In a similar way, pick an outer strand from the left and cross it over right. After that join it to the right section of hair.
- Don’t pull hair very tightly, as we need not make a tight fishtail braid. Repeat it again and again. While reaching too few inches, you can tie an elastic band to the braid.
- Again, start fishtail braiding as you did in the above steps. Depending on the length of your hair, you can divide your fishtail braid in 3 to 4 fishtails braid sections by securing with elastic bands and then doing braiding as we told you in the above step and in this step.
- Once you reach the end, you can tie your fishtail braid using a hair tie.
- You will love this style of fishtail flower braiding.
Tips for Fishtail Flower Braid
Do not make the braid very tightly, as it should look full of volume. Spray hairspray on your fishtail flower braid, so that hair should not come out of the flower braid bun and fishtail braid.


(19) Five Strand Braid
Are you bored of the typical three-strand braid? Then here, we bring for you the five-strand braid. It does look like a tricky hair braid style. And is not that easy to do. So, if you want to get this braid done, you can even ask any expert who can do the Five Strand Braid neatly. Like the one in the picture, you can make a bun from it at the back of your head or can simply let it loose.
How to do Five Strand Braid:
- Part the hair from the front from mid as we have to make two five-strand braids.
- Take hair from one of the sides and make five section out of it. So, as you have to make five sections out of it, take thick hair strands.
- Start braiding by taking the three middle strands and then making a stitch of the regular three-strand braid.
- Now we have to take the two side strands from the three strands braid.
- Pull the left-side strand of three strands braids over the extreme left strand which is not being used yet.
- Similarly, pull the right-side strand of three strands over the extreme right strand which is not being used yet.
- In a similar manner, keep braiding the three-strand braid first and then pulling the side braids of three strand over the extreme side braids of each side, as mentioned above.
- Make the braid 1-inch above the ear and keep doing it till you finish the braid. After that tie the braid.
- Now, take the thick hair section from the other side, and divide it into 5 strands equally.
- Braid this section also, just like you did the previous one till you finish it.
- If you wish to keep the braids like the five strand pigtails braid you can.
- Or you can fold them and make the bun out of the braids by tucking both side five-strand braids at the back of the lower head.
Tips for Five Strand Braid
If you want a thick five strand braid to choose thick hair strands. And if you want a sleek five strand braid, then you can take less hair.


(20) Four Strand Braid
If you do not want to spend much time in braiding your hair but want to look good, then the Four Strand Braid is for you. Just slay with the Four Strand Braid look. It can be worn normally also or at the workplace. And if talking about casual parties or travel plans, then also you can go with this look.
How to do Four Strand Braid:
- Comb your hair to the back of your head. And then gather all the hair in a ponytail shape.
- Divide it into 4 hair strands as we are doing a Four Strand Braid.
- Start with the strands in the middle. So, there are 2 strands in the middle.
- Now, bring the hair strand on the left corner under the two middle strands.
- The left middle strand will become the corner strand on the left side. And the second middle strand will become the left middle strand.
- Place the third strand from the left over the second strand from the left.
- Now, bring the strand to the right corner under the 2 middle strands.
- So again, the right middle strand will become right corner strand. And you have to place the third strand from the right over the second strand from the right.
- Repeat the above steps again for both the sides one by one until you reach the end.
- Secure the Four Strand Braid using the elastic and your braid will be ready.
Tips for Four Strand Braid
If you want to do the four strand braid exactly like the one in the picture, so you have to keep adding the hair from outside to the side strand when you take it underneath for both sides.


(21) French Braid
French Braid is favorite of many women. And it is one classic braid style which every woman can carry easily with medium to long hair. It is one of those hairstyles which are in for every occasion. Be it a wedding party, or socializing in the club, or even at the workplace as well. As you will look at the picture, you can see two French Braids. So here, we will tell you how to make these pigtail style two French braids.
How to do French Braid:
- Comb your hair, so that no knots are left. And then part your hair from mid from front head to back head till the neck. The partition should be straight without any zig-zag in between.
- Now, using a hair band tie the hair of one side, so that it does not come in between when you will do the French Braid of another side.
- Comb the hair of another side in an upward direction, away from your head.
- Once you finish combing, divide the hair at the top into three sections using your hand.
- As you have 3 sections now, start making the braid by adding some hair to one of the sections at the corner. And cross that section above the middle section making it in middle and the middle section will now be at the corner.
- In a similar way, add some hair to the other corner section and bring it over the hair section which is in the middle. And middle section at the place of that corner.
- Continue doing this by adding some amount of hair to both the corner section and making them cross over the hair section in the middle.
- Do it till you reach the end of the braid and tie it using a hair band at the bottom.
- Open the hair of another side, which you tied earlier.
- Repeat the same steps on that side also for making a French braid.
- Your two side French Braids are ready now.
Tips for French Braid
Use some hair gel before making the French Braid, so that it looks perfect without any hair coming out. While making the braid, make sure it is tight by pulling the hair of both the corner section and middle section tightly. After both the sides of French Braids are done, use a hairspray to prevent hair from flying and coming out of the braids.


(22) French Crown Braid
This braid style is a bit complicated one. And it’s not easy or possible to do this hair braid style alone. You will need a helping hand or someone else to make this French Crown Braid on your head. But once it’s done, it looks amazing and very stylish. Wearing this kind of hair braid with a party gown or by a cool chic is going to give a very glamorous look. But it is not possible to make it with the short or middle length hair, as it will look good on the one with long hair.
How to do French Crown Braid:
- As we say in every hairstyle, comb your hair from root to bottom, making them smooth without any knots.
- In this hairstyle we will need more of hair from the center, so comb the hair from the center only making half of the front hair coming all over the face or hanging in front of the face.
- Do partition of the hair from the center corner of one side or you can choose the left side above the ear. The hair will be parted in a way, like hair above the ear at the front and below the hair at back.
- From the hair above the left ear, take hair and divide it into three sections to make French braid.
- Start making French braid as we mentioned in the previous braid hairstyle. Remember, that you have to keep adding the hair from the center.
- The braid should go from the left ear to the front head around the center of the head.
- Continue making the French Braid around the head going from front head to right ear, and then back side of the head. While making the braid, make sure you do not miss on adding hair from the center head.
- Once, you reach the original position from where you started your braid, you can now make a normal braid with the hair which is left.
- Now tie the braid using a rubber band and pin it up using the bobby pins behind French Braid.
- Your French Crown Braid is now ready.
Tips for French Crown Braid
Do not forget to add the hair from the center. And to get a neat French Crown Braid, apply some hairspray or hair gel before doing this hairstyle.


(23) French Fishtail Braid
When someone says French Braid or Fishtail Braid, the oh so classic and stylish look comes in our mind. And when there is a combination braid of French and Fishtail Braid, then imagine how attractive you are going to look. Wherever you will go, you will seek all the attention because of your attractive look. You can go with this look anywhere, except the office meetings, or formal meetings and sports events. Otherwise, in every kind of party, you will look amazing with the full volume French Fishtail Braid.
How to do French Fishtail Braid:
- Comb the hair neatly, and then do mid parting of your hair just from the front.
- Now gather the hair from the crown of the head using your hands and divide it into 2 equal strands.
- Start making the regular fishtail braid with the two strands by adding the hair each time from the outer part. You can read above how to do fishtail braiding.
- Now after making 2 or 3 stitches, you can then start adding the hair from the front side in a similar way like you do in the fishtail braid.
- Keep switching the place from where to add the hair in the braid. So for once, you have to add the hair just from the outside of the braid which is next to the braid for both sides. And then you will switch to adding hair from the extreme right and left side or you can say from the front side.
- Keep doing it till you reach the neck’s nape. And after that make a regular fishtail braid till the end. And secure your French Fishtail Braid using a rubber band.
Tips for French Fishtail Braid
If you like your French Fishtail Braid to be tight then let it be like that. But if you want it to be a little loose, Then, you can slowly and smoothly pull the plaits without bringing the hair out from the braid.


(24) French Rope Braid
The French Rope Braid is a kind of French Twisted Rope Braid, which can be worn mostly during some active or sporty events. However, if given some other look like that on the side, it can be worn regularly also. It is not a very difficult braid to do but is not so easy also.
How to do French Rope Braid:
- In the French Rope Braid also, you have to start by combing your hair back and parting the hair from the mid in the front.
- Now to make this braid, firstly you have to divide the section on the front into 2 parts equally.
- And cross these sections over each other 2 times.
- Now add some more hair to both the strands from outside.
- You will now have to do twisting of the strands and have to again pass it over each other one by one.
- Keep following the above-mentioned steps till you reach to the end point and left with just 1 or half inches of hair.
- Tie the French Rope Braid using a rubber band.
Tips for French Rope Braid
While adding the strands and while twisting, make sure the hair does not come out. And pull hair tightly while adding them to make a neat French Rope Braid.


(25) Goddess Braids
These braids are originally from Africa, but you will see many Hollywood celebrities slaying the Goddess braid look at different events. These are good for the award functions, rock show, and concerts like events. The one in the pic is a combination of Goddess Braid and Box Braid. They are very time taking but the result is worth it. These are not any new braids emerging, but women are using them from quite a long time.
How to do Goddess Braids:
- To make a Goddess Braid there are different ways, so we will do like that in the picture.
- Just like in the crochet braids, the artificial crochet braids were added to the cornrow braids.
- Here, the goddess braids are being added in the ponytail with the help of the needle and hook.
- The other way to make the Goddess Braids are to do the braiding on the scalp like that in the Cornrow Braid.
- So, start the braiding from all the sides of the head to the center.
- And then, make the normal braids or long and sleek box braids.
- To make the box braids you will have to take a very small section of hair and have to divide it into 3 parts. Then, do regular braiding till the tip.
- Repeat the same by taking a small amount of hair every time, till the hair gets finish. But leave some hair strands for covering the elastic.
- Once you are done making the box braids, secure them in the form of high side ponytail. And to hide the elastic, you can use your hair strands by wrapping it over the elastic.
Tips for Goddess Braids
Whether you use extensions or you make goddess braids, do not forget to apply hair oil to keep your scalp and hair moisturized.


(26) Halo Braid
It looks so classy and distinctive than any other braid. Halo braid is a little difficult and tricky to do but once you will try this, with practice you will be able to do it easily. If you ask us, when to wear this braid, then we have a number of events for you to get this braid done. You can wear it to work every day to the formal parties, weddings, concerts, prom night, and many such events. You can make it using straight hair as well as curvy hair.
How to do Halo Braid:
- Whenever start any braid, do comb your hair to untangle any knot.
- Start with doing a side partition of hair.
- Pick the hair from the front head from one of the sections after the side partition. Also, remember that you have to pick the hair from the side which has more hair after the side partition.
- Divide the hair you picked into three equal strands for braiding.
- Now start braiding by putting the hair strands on the side over the middle strand one by one. Hold the hair tightly if you want the Halo Braid to look like that in the picture.
- Make sure that you keep braiding along the hairline and move towards the ear.
- While braiding, you can add extra hair from both sides.
- Keep braiding behind the ear to the bottom. Once you are done with this braid, tie it with a hair tie.
- Now start on the other side of the partition and make it in the same way to the bottom.
- Now it will look like you have two pigtails.
- To give a look of a full circle at the back also, place the braid on the right side across the left. And pin it up using hair pins.
- Do the same with the braid of the left side, by putting it across the right, and then secure it using hair pins.
Tips for Halo Braids
If you have curly hair and you want exactly the same look, then you need to straighten your hair.


(27) Inverted Fishtail Braid
You all have read above how to do the Fishtail Braid. Here, we will see how to do the Inverted Fishtail Braid. And do not think too much that how it will look. As it will look as amazing as the Fishtail Braid. You can see that yourself in the picture. And if we talk about how difficult it is, then do not worry, as it is not that difficult, if you can do a fishtail braid, you will be able to do it quickly and easily. You can wear this pretty look at any wedding function, any traditional event, or during travel or for night outs also. This will look beautiful on any outfit.
How to do Inverted Fishtail Braid:
- Comb your hair towards the back of the head just like you do in the normal fishtail braid.
- As we have to make an Inverted Fishtail Braid, so the technique of braiding will change.
- So, we have to do the braiding in an inverted manner. Take hair strands from the mid of the head.
- Divide it into 2 equal parts. Pick the hair strand from the outer left side and pass it under the left side strand and combine it with right strand.
- Do from the other side now, by picking up hair from the outer right side and pass it under the right-side strand and then combine it with left strand.
- Keep repeating the steps until you reach the end.
- Then, secure your inverted fishtail braid using a hair tie.
Tips for Inverted Fishtail Braid
If you want a relaxed inverted fishtail braid then don’t put the strands very tightly. But if you want to make a tight inverted fishtail braid, then pull strands tightly and hold them tightly.


(28) Lace Braid
If you do not want to do a full braid, then you can choose lace braid also. Here, we will guide you on how to do this upward lace braid. Whether you try it on a teenage girl or a woman in 20’s, it will compliment everyone. You can try it on wavy or curls also. No particular occasion is needed to try this look, as it will suit most of them.
How to do Lace Braid:
- Start with combing and detangling your hair properly.
- You have to then do a middle partition of the hair from front dividing the hair into two equal parts.
- From the right side of the hair, take some hair strands. Divide those hair strands into two equal parts.
- Start creating a braid now, by picking up the hair strands from the outer portion and adding it to the braid just like you do in the French Braid or Fishtail Braid.
- Make sure you create the braid around the head like that in the picture. And make the braid length only till the crown, leave rest of the hair like that.
- Using the bobby pins tuck the hair properly at the back of the head at the crown.
- Now take the hair strands from the left side of the hair and divide them into equal parts.
- Repeat the same procedure as you did for the right side and at the end tuck that also at the crown joining both the braids together.
- You can use a bow to put at the crown where both the braids are joining.
- Now you have a beautiful lace braid.
Tips for Lace Braid
At the end, if you want to use the hairspray, you can. Do not make the lace braid very thick.


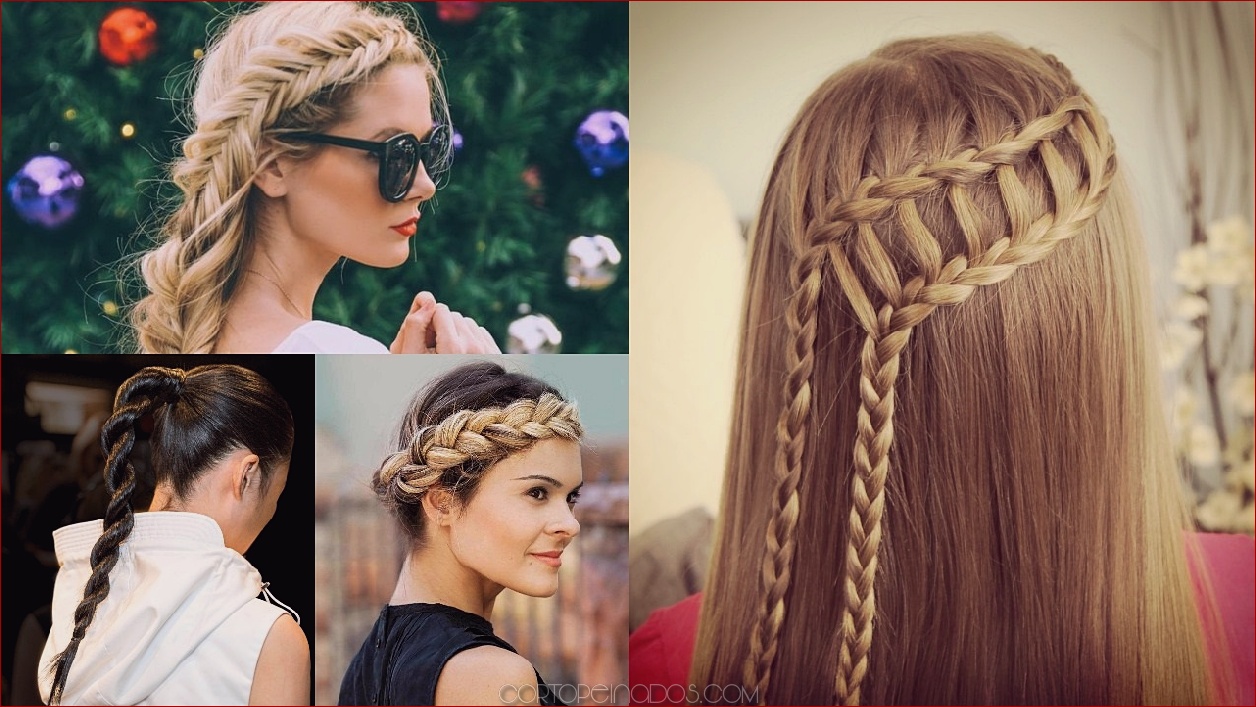
(29) Ladder Braid
This braid style is trending these days. For women who have long tresses, do try this style for once. And, you will surely go for it again and again. The ladder braid can be made in different styles. It has a class and looks great especially on the straight hair. You can decide yourself, on which occasion you would like to do this braid.
How to do Ladder Braid:
- For making this Ladder Braid, start by picking up a small strand of hair from any of the side (you can choose according to yourself).
- You have to make a waterfall braid with twisting the hair strands. As you can see in the picture, the top one is the waterfall twist braid and the bottom one is the lace braid.
- You can read below how to do waterfall twist braid. Once you reach the end of doing waterfall twist braid, tie it up using a hair tie. Remember, you have to make it till you reach the center of the head.
- While you are doing waterfall twist braid, ask someone to help you in holding the waterfall strands which you passed in between the twists.
- Again, take small strands of hair just 1-inch below the waterfall twist braid.
- Start doing the lace braid by reading the instruction from the lace braid tutorial which we have mentioned above.
- While doing lace braid, you have to pass the same waterfall strands from between the lace braid, that is why we asked you to take a help of someone in holding those hair strands.
- Keep passing each waterfall strand from every stitch of lace braid.
- Once you reach the point where waterfall strands get over, just tie using a hair tie.
- You will now see both braids together giving a look of Ladder Braid.
Tips for Ladder Braid
For Ladder Braid, you can use even normal waterfall braid also at the top instead of using waterfall twist braid. Use hairspray after completing the braid, so that the hair coming out should stick to one place.


(30) Lattice Braid
With the different colors shade, this braid is looking very vibrant and sassy. You can also call the lattice braid as the basket braid. It does look easy but it is a bit tricky braid. You will need someone to help you doing the Lattice Braid. You can wear this braid on different informal or casual occasion. You can also get your hair colored like the one on the picture, to make your braid look more stylish. We are going to explain you about how to do a normal lattice braid.
How to do Lattice Braid:
- Start with combing hair towards the back. Then, we will start making the Lattice Braid.
- Take, around 4 hair strands from your head, depending on how big lattice braid you want.
- Now, ask someone to hold all these strands separately and vertically.
- You have to now pick one more strand from the left side and start moving it horizontally.
- When you will move the braid horizontally, you have to pass it under and over these 4 vertical strands. Start by passing the hair strand horizontally under the 1st strand. Then over the 2nd strand, again under the 3rd strand, and over the 4th strand. Ask that person to hold this horizontal strand also.
- Now pick the other strand to pass it horizontally, and this time you have to pass it over the 1st strand, then under the 2nd strand, again over the 3rd strand and then under the 4th strand.
- Let that person hold the second horizontal strand also.
- In a similar way, pass around 4 more horizontal hair strands from the vertical strands. But remember you have to keep switching the order. Like the third horizontal strand will go under the 1st vertical strand, then over the 2nd strand, again under the 3rd strand, and over the 4th strand.
- And then the 4th horizontal strand will be vice versa of the 3rd one.
- Once you have done it, you can then either pin up the horizontal strands behind.
- And tie the vertical strands using a hair tie. This will give it a look of the basket.
Tips for Lattice Braid
Hold the strands tightly, to give the lattice braid a nice look.

(31) Mermaid Braid
There are many women around the world who are a fan of Mermaid Braid. The braid looks so elegant and beautiful, that every woman would love to get it. Even many Hollywood and Bollywood actresses also have tried this hair braid. You can wear this hair braid with different dresses, as it will suit any dress style.
How to do Mermaid Braid:
- You have to start by taking a section of hair from the head’s top near the hairline.
- Divide the section of hair into 2 strands equally.
- You have to braid it like the fishtail with a little bit of technique.
- So, initially for the first stitch, you will do as fishtail braid by taking hair from the left side and crossing it over the left strand and then joining it with right strand.
- After that, take the hair from the right side and cross it over the right strand and then join it with left strand.
- Now, start taking hair from the hairline also and add it while braiding.
- So, above steps will go same, but when you will cross the right-side strand with the right-side hair and will join it with left side strand, also add the hair from the right-side hairline to the left side strand.
- And when you will cross the left side hair over the left strand and will add it to the right strand, also take hair from the left side hairline and add it to the right strand.
- Continue braiding using the same steps mentioned above until you reach the neckline.
- From the neckline, you can do the normal braiding, as you did in the first step, but you have to pass the hair under the strand instead of passing it over the strand.
- Once you reach at the end, just tie your braid using an elastic band.
Tips for Mermaid Braid
Pick the equal hair from the hairline while braiding. In the end, you can also try normal fishtail braid instead of the reverse fishtail braid.


(32) Micro Braids
These braids are mostly for the women with curly hair. And this style is being carried mostly by African women. They can be simply done by using the reverse three-strand braid. But on the other hand, one needs to invest a lot of time in braiding the micro braids. You may need someone’s help also to do these braids. So, here we are sharing with you how to do regular micro braids.
How to do Micro Braids:
- Firstly, do the basic things what you need to do before the braiding like washing hair, conditioning them, oiling them, and dry them. After that detangle all the hair strands.
- For short hair strands, it is a bit easy to do, but for long hair, it is time taking. So divide your hair strands into many small sections.
- Now take that small section and divide it further into three parts so that we can make a three-strand reverse braid.
- To do a reverse three-strand braid, you will have to pass take the left strand and pass it under the middle strand, which makes the middle strand the left side strand and the left one the middle strand. Now, take the right-side strand, and pass it under the middle strand. So, the middle strand will become the right strand and the right one will become the middle strand.
- Complete the braid until the end.
- Repeat the same for all the sections of your hair, and your micro braid will be ready.
Tips for Micro Braids
It is very essential to moisturize the hair, as your hair may become dry after making these braids. So, at least oil your hair and scalp once or twice in a week.


(33) Milkmaid Braid
The Milkmaid braid is up for the summer fashion and the spring fashion. It has been styled by many Hollywood celebrities at different events. It is not very difficult hair braid style but reflects elegance in the style. You will look absolutely beautiful with this look. If you have long hair, do try this hair braid style.
How to do Milkmaid Braid:
- We will start with doing the partition of hair in two parts from front to the neckline.
- Now, pick hair from any of the sides, and start braiding.
- You have to make a normal braid, which has to go horizontally towards your face.
- Once you are done with making this regular braid at one side, tie it with a hair tie.
- Now, do the same on the other side of your head also.
- After that, take anyone braid, put it over the head’s top but around 1-inch away from the hairline or the forehead.
- Similarly, take the other braid, and put that too also over the head.
- Tuck the end of both the braids under each other using a hairpin or bobby pin.
- Also, secure the braids using the bobby pins, so that the braids remain at one place. Your milkmaid braid look is now ready to flaunt.
Tips for Milkmaid Braid
Do not braid hair very tightly. Leave some hair strands in the front of the face, to give a frame to the face. You can also make use of hairspray for both the braids.


(34) Natural Hair Braids
Another hair braid, which is mostly being used by the women if Africa or America. The natural hair braids have different variations. And it can be made using the neck length hair, mid-length hair, and the long hair as well. Most of these braids are being made using the box braids and the cornrow braids style. Women do use extensions also to carry these braids look.
How to do Natural Hair Braids:
- To make the natural hair braids, you will have to do the box braiding only.
- So, firstly start with cleaning up of hair, and then dry it properly. Brush your hair to remove knots.
- You can do the cornrow braiding at one side in horizontal direction like in the picture, you can see cornrow braiding is done from left to right horizontally. (For doing cornrow braiding you can read the steps above in the cornrow braid tutorial).
- Then, you can start the box braiding on the other side, which means the right side of the hair.
- For that, you have to divide your hair into many small sub-sections.
- Take any one small sub-section and do the division of it in three parts. Start braiding the regular braid using three strands from root to tip.
- Keep braiding all the sub-sections in a similar way.
- To tie the hair or to secure them, dip all the sub-section braids into hot water. It will keep them from opening. So, now your natural hair braids are ready.
Tips for Natural Hair Braids
Do not tie, the box braids very tightly, as it will affect your hair and scalp both. No matter for how long you keep this natural hair braid but do wash your braids at least one time in a week and apply oil as well. Also, use satin or silk pillow cloth or either wrap your braids in satin or silk cloth while sleeping.


(35) Pull Through Braids
A new name in the list of braids but look wise this looks fabulous and hot. In the picture, you will see a horizontal pull through the braid. It can be done vertically also, and that also looks quite glamorous. It is much easier to do this braid than some other braids. And for occasions like wedding, prom night, clubbing, night out, this look is going to rock.
How to do Pull Through Braids:
- First of all, you have to do a side parting of the hair, and we will start braiding with the part which has more hair.
- So, we are starting with the left side. Divide the hair on the left side in a triangle shape section. And secure it with the elastic band.
- In a similar way, you have to pick some more hair strands behind the first tie in the same shape. Tie this one also using an elastic band.
- Now, split the first hair tie into 2 parts, and take the second hair tie, and put it in between the first hair tie split.
- Combine the 2 split sections of the first hair tie again, so that they can wrap the second hair tie section which is in the middle of the two.
- Take some hair strands from outside and bring them to the split parts of the first tie. So, in total now there will be three hair strands including the 2 split hair strands of the first tie and one new hair strand.
- Tie all the three together, using a hair tie. This makes the third hair tie.
- Now split the second hair tie section into two small parts and bring the third one in between the two. Clip the third one like you did the second one before.
- In a similar way, as you did for the first tie, bring the split sections of the second tie together along with some hair strands from outside. And tie the three strands together making use of a hair tie. This will make a fourth hair tie.
- Keep repeating the above steps, until you reach the right side.
- Starting from the right side, pull the sides of the pull through braid slowly and gently, so that it looks full of volume.
- Do, it with all the sections, so that they look same in size. And your pull through braid is now ready.
Tips for Pull Through Braids
To hold this style for a long time, spray some hairspray on the pull through the braid. You can also make the vertical pull through braid in a similar manner.


(36) Rope Braid
Carrying a hair braid which looks very stunning and sporty at the same time is what many women want. The Rope braid is one such braid which can be done easily and gives a strong look to your hair. If you are a sports person, I will definitely suggest this one to you. Even you can carry it normally also like that in the picture. Here, we will guide you how to make a regular rope braid.
How to do Rope Braid:
- Clean your hair and then dry it. After that comb, it properly to solve all the tangles to avoid any bumps in the braid.
- After brushing up your hair towards the back, bring your hair together at the crown of the head, to make it into a high ponytail.
- Tie the ponytail using a hair tie, and then take some hair strands from under the ponytail and wrap it around the hair tie to hide it.
- Now, divide your ponytail hair into 2 parts equally. Hold the right section in right hand, and the left one in the left hand.
- Now, start twisting both the section tightly but individually in the clockwise direction.
- After that, start twisting both the sections of hair around each other in the opposite direction.
- Once you reach at the end, tie them using an elastic band.
Tips for Rope Braid
You can use hair cream to bring the smoothness in the braid. In the end, you can use hairspray so that the hair strands in the rope braid do not break and come out because of twisting.


(37) Senegalese Twist Braids
Mostly used by the African-American women, this braid has now made its own place among the other braids. You will see many women of Hollywood carrying the Senegalese Twist Braids or Buns look. Braiding this one is difficult to do, and you can even add the extensions for saving your time. Depending on the event you can either let your Senegalese twist braids loose or can tie them up in a ponytail or a bun or maybe fusion also.
How to do Senegalese Twist Braids:
- As these braids are going to be on your head for quite a long time, so it will be good if you can wash them properly and moisturize them. Let them get dry and then comb them to solve the knots.
- With the help of a rat tail comb, you can part some section of hair strands at your head’s back.
- Secure rest of your hair strands using hair clips.
- Now, the hair section you separated will be the 1st row, and you have to take a small section from it in the shape of a box, which will be of the size of your finger’s width. Again, secure the rest of the hair strands in that row using hair clips.
- Now divide the hair of that box-shape section into 2 parts equally.
- With the help of your fingers, you have to start twisting the sections in the right direction while holding the root of that section tightly. Keep twisting until they form a coil like a shape.
- Do this with the other section also. And then you can switch the place of the two sections by putting the right coiled section over the left one.
- Complete twisting the hair of the whole row by using the above steps by dividing them first into the box.
- Once you are done with the row, start taking another row above it and do the same with them. Keep doing it till you finish the whole head hair.
- For securing all these braids, you can dip the end of these braids into hot water for sealing them.
Tips for Senegalese Twist Braids
Do use oil on your Senegalese Twist Braids at least two times a week. You can make the use of extensions also following the same steps.


(38) Skeleton Braids
Skeleton braids are also medium level braids which can be made easily but will need some effort. Most of these kinds of braids are for all the occasions. And you can wear this braid with different outfits as well, from the denim to the dresses. The skeleton braid in the picture is not that difficult to make, so let’s start with it.
How to do Skeleton Braids:
- Your hair should not have any knots, so make sure you untangle them before we start the braiding process.
- Now bring all your tresses back and pick some hair strands from the center.
- You have to now make a regular braid by these hair strands. So, divide them into three sections, and start making a regular three-strand braid. If you don’t know how to make one, you can read it in the tutorial below.
- Make sure you make a very sleek braid, so pick hair also according to that only in the starting (above step).
- Once you are done with the braiding part, secure it using a rubber band.
- Now, loosen the plaits of your braid by pulling them slowly.
- It’s now the turn to pull some hair strands from both sides of your face as well. And add them to the braid, like you can see in the picture, the braid is covered with hair strand from both sides making a rib or skeleton structure.
- Keep doing the same till you reach the end.
- You can also twist the strands which you have added to make this braid.
Tips for Skeleton Braids
To get this braided look, you need to have straight hair, so if you have curly hair use straightener. Also, at the end use hairspray to keep braid perfect.


(39) Spiral Braids
Spiral braids is something very unique and gorgeous to make. After looking at this braid, many ladies find it difficult to do. But actually, it is not that difficult. And if you will learn to do it once, you can try it again and again.
How to do Spiral Braids:
- After combing your hair, use your comb to get your head’s center. And from there pick up some hair strands.
- Divide the hair strands into 3 equal parts for braiding.
- Start making the regular braid in the starting, but the braid has to go around in circular motion.
- While making a braid, keep adding the hair strands to it from the side and that too in circular motion only. It will be like a French Spiral Braid.
- Continuously keep braiding in the same way, you will notice the spiral braid forming.
- After reaching to the end, keep braiding till the tip. And tie it using a hair tie.
- To make the extra braid a part of your spiral braid, you can pass it from any of the circles. And to secure that extra braided part, you can secure it using a bobby pin.
- Your spiral braid is now ready.
Tips for Spiral Braids
In case, any hair strands are coming out, use hair pins to put them back at their place. And you can also make use of hairspray to keep the braid for a long time.


(40) Three Strand Braid
A three strand braid is one of the most common braids which most of us know. We have been doing this braid from our childhood, but still many of us don’t know how to do it. And we take others help for doing it. But with the steps we are going to share with you all here, you all will not at all need anyone’s help in doing a three-strand braid. Most importantly, that this braid goes with almost everything, and it is being used with other braids also as a fusion.
How to do Three Strand Braid:
- The first thing you need to do is to untangle your hair by combing it properly.
- Comb your hair back, and then from the crown of the head, pick a thick amount of hair strands. And divide them into 3 sections.
- We will now start braiding the three-strand braid. So, take the left strand and put it over the middle strand. By doing this the middle strand will come on the left side and the left one in the mid.
- Now, cross the right strand over the mid-strand, making mid-strand at right. And right strand in the mid.
- Follow the above-mentioned steps again and again and turn by turn, which means left one then right one and so on.
- By doing this you will reach at the end and the braid will get complete.
- Tie the braid with the help of an elastic band.
Tips for Three Strand Braid
Here we have told you about the simple three-strand braid. But you can try different variations or can make even two three-strand braids also.


(41) Triple Fishtail Braid
We already love fishtail braids, and when we see that there are many variations available in the fishtail braid, we feel like trying every braid. As it looks stunning and very pretty also. In this triple fishtail braid, three fishtail braids are being braided together to make this braid. There is no doubt how beautiful this braid will look for any wedding related occasion or parties also.
How to do Triple Fishtail Braid:
- If you know how to make a fishtail braid, then you can easily make the triple fishtail braid.
- Properly comb your hair by solving all the tangles. Then, divide your hair into three parts. One part at the back and the other two parts at both sides.
- Pick any of the sides and start making fishtails braid from it by dividing it into two strands.
- You can check above the method of doing fishtail braiding, and you have to follow the same.
- Once you are done with the fishtail braid of one side, secure it using an elastic band.
- Take the hair strands of another side, and again you have to make the fishtail braid only. So, follow the process given above in the fishtail tutorial and braid it.
- After finishing the other side braid, just tie it up using an elastic band.
- It’s now the time to take the third section of hair which is at the back and start doing the fishtail braiding. After finishing the fishtail braid, secure this braid also with an elastic band.
- Now you have 3 fishtail braids on your head. And you have to braid them together to make a Triple Fishtail Braid.
- You can start braiding all the fishtail braids like you do a regular braid of three strands.
- And once the triple fishtail braid comes to an end, tie it using a hair tie.
Tips for Triple Fishtail Braid
Make use of hairspray, so that your triple fishtail braid looks as beautiful as the one in the picture.


(42) Waterfall Braid
Whether it is a back-waterfall braid or the one on the side, both looks great. The good part about the waterfall braids is, that you need not worry about your hair texture or hair type. It can be done on straight smooth hair and on curvy and wavy hair too. It suits both the formal and the informal occasions. A neat side waterfall braid for an office party is perfect. And in a similar way, it adds charm to your look when you wear a back-waterfall braid with curvy hair for a wedding reception.
How to do Waterfall Braid:
- As it is a side waterfall braid, so, first of all, do side parting of the hair.
- You can make a braid on any of the sides, so we are doing it on the right side.
- Take hair from the front head near to the hairline and divide the hair into two parts.
- Make the hair strand near the hairline cross over the other hair strand.
- Bring a new hair strand from the inner side of the head, and make it fall on the inner strand passing it under the strand near the hairline.
- Let that new hair strand which you added from outside fall in between the braid giving a waterfall look.
- Repeat the same steps again by crossing the outer strand which is towards the hairline over the inner strand. And then adding a new fall by passing the new hair strand from the top of the head in between the braid.
- You have to braid it till you reach the crown of the head.
- Once you reach there, you can either secure the hair with the help of elastic or bobby pins. Or you can continue braiding but, it has to be a normal three strand braid. And tuck the braid at the back of the head at the crown.
Tips for Waterfall Braid
You can use hairspray to make this side waterfall braid looks more perfect.


(43) Waterfall Twist Braid
Waterfall Twist Braid is not much different than the regular waterfall braid. Here, the braid is being made by twisting it. It can be made without much difficulty. A gown or a dress will perfectly go with this braid. Even you can wear it on denim and tops as well. Because of the curvy hair, this braid is looking full of volume. It will look dazzling on anyone who will wear this braid.
How to do Waterfall Twist Braid:
- After combing and parting your hair from the front mid, you have to start the process of braiding.
- For braiding, you will have to take a large amount of hair from one side of the front head.
- Do the division of the hair strands into 2 equal parts. And hold them just like you do during the regular waterfall braid.
- Put the outer strand over the other strand.
- Now, take extra small hair strands from the partition side and put it over the hair strand on the inner side and then under the hair strand on the outer side.
- You will need someone’s help for holding that hair strand which you passed in between the braid.
- Again, cross the outer side strand of the braid over the inner side strand. Take the extra hair strand again and make them fall from the mid of the two braids. But make sure that the braid should go cross over the inner strand of the braid and should pass under the outer strand of the braid.
- Ask the person to hold this hair strand also which you passed between the braid.
- Continuously keep doing the same steps as mentioned above till you braid around your head.
- To secure the braid, use bobby pins. And your waterfall twist braid is ready now.
Tips for Waterfall Twist Braid
Take a thick section of hair for the waterfall braid, so that you can complete the braid and reach the other corner of the head.


(44) Zig Zag Braids
If you will look at the picture, you will find that this braid hairstyle is a mixture of two braids hairstyle. One is the zig-zag braid hairstyle and the other one is the waterfall braid hairstyle. We have already checked above how to do Waterfall Braid Hairstyle. This zig-zag braids hairstyle will surely catch many eyes. For the occasions like a wedding ceremony or reception, or any grand house party or traditional party, this look is completely perfect.
How to do Zig Zag Braids:
- Brush your hair towards the back, and then you have to start braiding.
- You can start braiding from any side, either right or either left.
- We are going to guide you how to start braiding from the right side. Take hair strands from the right side from the hairline and around 1-inch above the ear.
- Divide the hair into 3 sections equally and start braiding diagonally from right to left.
- While braiding when you will move from right to left, also keep adding the outer hair strands in the braid on both sides. This will help in attaching the braid to the head only with the help of strands.
- Once your reach to the left while braiding, now start braiding towards the right and that too diagonally by adding outer hair strands.
- Keep moving the braid diagonally after reaching to the left and right corner.
- Once you reach the end of the braid that is the tip of the hair, all the hair should be attached to the braid.
- You will see a zig-zag braid at your back.
Tips for Zig Zag Braids
You can try any other braid also like the fishtail braid or lace braid for braiding Zig Zag Braid. Try this only if you have long hair, as this does not look great on medium or short length hair.


(45) Zipper Braid
Coming to our last braid, which is the Zipper Braid, it looks stunning. But when it comes to styling and doing this braid, it is not that easy task. It goes well for someone with long tresses but needs an expertise in braiding to do this style. Being one of the stylish updo hairstyles, you can carry Zipper braid at any formal party.
How to do Zipper Braid:
- To start this braid, first of all, wet your hair and comb it properly.
- We will start by taking a small amount of hair from the top of your head. Now divide the hair strands into 3 parts.
- Start braiding it by placing the middle strand over the left strand. So, now the left strand will be the middle strand and you have to take this strand over the right strand.
- Now, after the first stitch, take the strand in the middle over the strand at the left. And now instead of taking it over, take it under both the strands at right.
- You will have to take someone’s help to hold it.
- Take hair from the right side of your head as a new strand and cross it over the middle strand. And then cross it below the left strand.
- Again, you will need someone to hold it.
- Your base stitches for the zipper braid are now ready.
- Make sure that both the strands at left and right which was asked to hold are held by someone.
- Take some hair from the left side and cross it over the middle strand and then below the right strand. Ask the person to hold this strand as well.
- Bring the first stand at right held by that person under the second or new strand.
- Then, add this strand to the middle one.
- Now, repeat the same steps for both right and left side, until you have no hair left to add in the braid.
- Make a regular braid with the left hair strands. And twist it to make a bun from it.
- With the help of bobby pins, secure the bun at the required place.
- You will see the zipper braid hairstyle now on your head.
Tips for Zipper Braid
Do wet your hair before doing it. You can also add hairspray once you finish it.


So, here is the end to all the beautiful hair braids which we have selected for you. We tried our best to share the simplest steps for making these braids so that you can do it with ease. After looking at these easy braid hairstyles, we are sure you cannot say that braids hairstyle is out of fashion. As it is now trending everywhere. Now, you have a collection of different stylish and classy braids which you can wear on the number of occasions or even day to day also. Do try these hair braids and let us know which one you liked the most.